Showing posts with label Programming. Show all posts
Monday, 10 June 2019
How to Build a Paint App!
In this tutorial you will learn how to create a simple paint app coded in ES6. All you need to understand this tutorial in some basic knowledge of ES6 and a few months of coding experience in Javascript/ES6 and you are good to go!
Now this is just a simple “Paint App” but upon this same logic a lot of complex software can be developed.
Go through the following exercise, keep it simple, and take it as it comes:
1) Use javaScript/ES6 to generate HTML & CSS.
2) Build a “Paint App” with the ability to alter resolution by mutating the app.resW & app.resH variables.
3) The display should represent a 2d array named matrix.
4) Compound loops should be used to iterate through the matrix/multidimensional-array.
Here is the code we have:
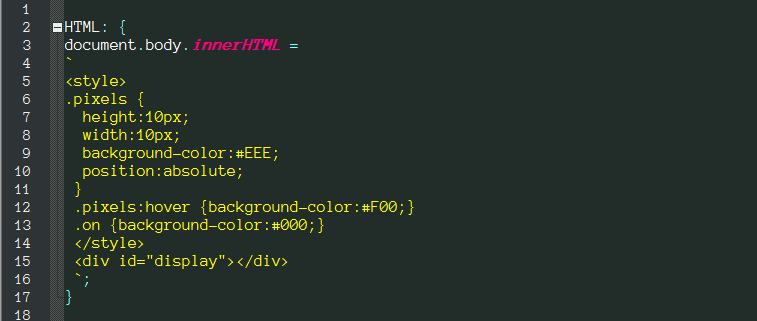
The HTML part is:
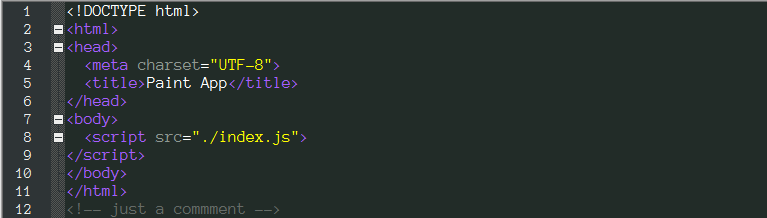
To view it in the browser:
Now let me narrate each line of code so we can learn it better:
First of all there is the HTML label, it covers most of the HTML & CSS generation process of our code.
There is a class named pixels which belongs to each individual pixel on our canvas, it makes our pixels square shaped. Now in modern day an actual pixel is one of those really small squares on the screen, however back in the day those squares used to be gigantic like the ones in our app, our browser may crash if we try to generate a 1px², 600px*800px canvas, so instead we are generating a 10px²,30px*30px canvas.
There is a hover pseudo-class on pixels, this highlights (in red) the pixel to show the user which pixel their identifier/cursor is targeting.
There is a class named on which changes the color of a white pixel to a black pixel giving the user the ability to draw and write on the canvas with black color.
There is a divider with id “display” this will clench all our pixels within itself. This concludes the HTML label portion of our code.
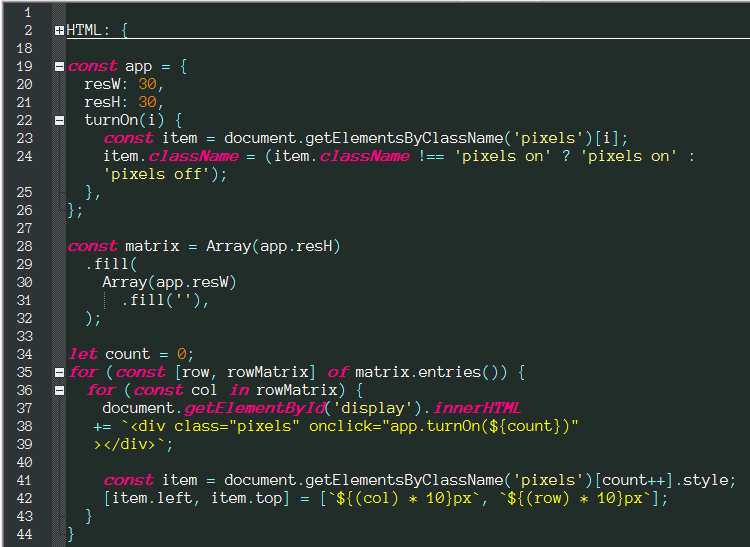
Then on line #19 we have an object named “app”, in this object we are plotting some vital policies of our app, we have the width and the amount of pixels assembled in each row of pixels in our app’s canvas established in the resW property, and we have the height and the amount of pixels assembled in each column of pixels in our app’s canvas established in the resH property.
Finally we have the method that toggles a pixel between black and white colors so we can draw upon our canvas. To this point we are just storing data that is a prerequisite to spreading out a mutable canvas.
Finally we have the method that toggles a pixel between black and white colors so we can draw upon our canvas. To this point we are just storing data that is a prerequisite to spreading out a mutable canvas.
Then on lines #29 to #33 we have a variable named “matrix”, this is a record of each pixel in our canvas, if we ever need to export our drawings into a separate file to save them we will actually be saving a 2-dimentional matrix of pixel data. This code narrates like this “Declare a variable named matrix, in this variable we have an array with (resH) amount of members, within this array all members are arrays, each of the latter array has (resW) amount of members, each of these members are an empty-string”.
Now from line #35 to #47 we have a two-way loop that extracts each pixel data from our matrix and directs it towards display on lines #39 to #41; Now on lines #43 to #46 we are placing/spreading each pixel to its proper place. The row & col variables on lines #36 & #37 are index numbers and are used as co-ordinates for pixels. The code narrates like this “Extract the 1st pixel from the matrix and spread it on (#display) canvas, give this pixel the class `pixels` and the ability to toggle between black and white colors when clicked; place this pixel on co-ordinates (x, y) where x equals 10 times its vertical placement in the matrix and y equals 10 times its horizontal placement in the matrix”.
This code is taken from the #1 best-seller book Simply ES6 By Ray Voice.
Simply ES6 is a great book for you whether you are a few months or few years into your web-development training. This book will save you years and years of frustrated lessons.
The lessons are well structured, each section begins with a brief introduction, followed by tons of examples to follow and play with; and each chapter ends with a practice project explained in extensive detail, followed by a summary of that chapter to really condense the skills learned.
If you love JavaScript then this book is for you! If you want to master JavaScript then this book is for you!
Get yourself a copy of the #1 new release & #1 best-seller from Amazon Now!
Wednesday, 26 December 2018
Javascript Algorithms And Data Structures Certification
Basic Javascript

Comment Your Code:-
Comments are the lines you write for yourself or for others to understand your code because sometimes you will write a piece of code and then look at back at it days later and not understand what hell did you even wrote that in the first place? Or maybe jsut comment out a piece of your code to see what the problem code is.
So long story short comments are the lines that will not interfere with your lines of code because Javascript will ignore that line.
How Comment Your Code:-
Well there are two ways to comment your code in Javascript.
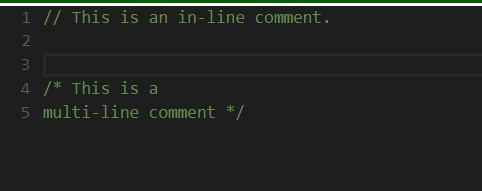
One way is using "//" which will make one line of your text a comment and ignore the remainder
The other way is using /* */ write your text between those and it can cover as many lines as you wish
for example see below
Data Types in Javascript:-
First of all you must know that data is anything that is meaningful to computer There are seven different types of data type in javascript which are :-Undefined, null, boolean, string,symbol, number, and object For example computer distinguishes between numbers, such as number, 21, and strings , such as "21","mouse", or "567". As you all must know already that computers can perform mathematical operations on numbers and not strings.
Variables in Javascript:-
Now variables work as labels for the computers to read and recognize as the given data type. any of the seven data types can be stored in a variable. Variables are similar to to a and b variables you use in mathematical expressions. Computer variables differ some what from mathematical variables in the way that they can store different values at different times.
How to Declare A Variable in Javascript:-
To declare a variable in javascript you have to use the keyword "var" and then name it whatever you like using numbers, ltters, @, $ or _ . But remember there are some reserved word that if you use might give you errors. Example is given below.

Assign A Value to a Variable in Javascript:-
In Javascript we use an assignment operator to store values in a variables like var myName="jo"; or var myNum = 2; Assignment always goes from left to right of the "=" operator is resolved before the value is assigned to the variables to the left of the operator. For example in the code below var a is assigned the value 7 and var b is assigned the value of var a.

Initializing A Variable in Javascript:-
Initialize a variable basically means to assign a value to it. like var a = 9; there var a now has an initial value of 9.
Javascript is Case Sensitive:-
Javascript is a case sensitive language meaning if you write a variable named var Myname and another variable var myName both will be recognized as different variables.
Note:If you liked my post then hit the subscribe button!
Monday, 22 January 2018
CatPhotoApp (FreeCodeCamp Front-End Development Certification)4
Delete HTML Elements
In this task all you have to do is delete your <h1>Hello World</h1> tags from the editor leaving
<h2>CatPhotoApp</h2>
<p>Kitty ipsum dolor</p>
untouched.
Click on run tests or press Ctrl + enter.
Now moving on to the next task .
Change the Color of Text
In this task we will be changing the color of our h2 element by changing the style we have to add style ="color: red" to your h2 tag like this
<h2 style="color: red">CatPhotoApp</h2>
<p>Kitty ipsum dolor</p>
Click on run tests or press Ctrl + enter.
Now moving on to the next task .
Use CSS Selectors to Style Elements
CSS stands for Cascading Style Sheets is a style sheet language used for describing the presentation of a document written in a markup language.
There are alot of css properties you can use to change the way your element looks like taking the style example from above
<h2 style="color: red">CatPhotoApp</h2>
by doing this only this tag is effected, if i write another h2 tag nothing will happen to it until i have styled it too that would make my code too long and a bit messy so we use css instead.
Now for that you need to open <style> element on the top of your code like this
<style>
</style>
with css you can select all h2 tags like this
<style>
h2 {
color: red;
}
</style>
Now the given task is to delete your h2 element style attribute and create a css style element like this also this time the color of text should be blue
<style>
h2 {
color: blue;
}
</style>
<h2>CatPhotoApp</h2>
<p>Kitty ipsum dolor</p>
Then click on run test(Ctrl+enter)
3 Tasks Completed!
That's it for now
Comment below to ask and questions related to this and I will be sure to answer it
Don't forget to like, tweet, share, subscribe!
Sunday, 21 January 2018
CatPhotoApp (FreeCodeCamp Front-End Development Certification)3
Comment out HTML
So this task is pretty simple in this all you have to do is comment out your <h1>Hello World</h1>tags and <p>Hello Paragraph</p>tags
and leave the <h2>CatPhotoApp</h2> tag uncommented
Like this..
<!--
<h1>Hello World</h1>
-->
<h2>CatPhotoApp</h2>
<!--
<p>Hello Paragraph</p>
-->
Click on run tests or press Ctrl + enter.
Now moving on to the next task .
Fill in the Blank with Placeholder Text
<h1>Hello World</h1>
<h2>CatPhotoApp</h2>
<p>Kitty ipsum dolor</p>
It says that web developers usually use lorem ipsum text as place holder text. The 'lorem ipsum text' is randomly scraped from a famous passage by Cicero of Ancient Rome.
But since we are making a CatPhotoApp lets use something called kitty ipsum text
Kitty ipsum dolor sit amet, shed everywhere shed everywhere stretching attack your ankles chase the red dot, hairball run catnip eat the grass sniff.
The task here is simple all you have to do is copy a few words from the paragraph above and paste & replace it between your
<p>Hello Paragraph</p>
Like this<p>Hello Paragraph</p>
<h1>Hello World</h1>
<h2>CatPhotoApp</h2>
<p>Kitty ipsum dolor</p>
Then click on run test(Ctrl+enter)
2 Tasks Completed!
That's it for now
Comment below to ask and questions related to this and I will be sure to answer it
Don't forget to like, tweet, share, subscribe!
Saturday, 6 January 2018
CatPhotoApp (FreeCodeCamp Front-End Development Certification)2
Inform with the Paragraph Element
p elements are preferred elements for normal-size text used in website paragraph.
You can create a p element like <p>hello</p>
see it's simple now in this task all you have to do is go on the next line below your <h2></h2> tags
in the editor write
<p>Hello Paragraph</p> that's it for this task.
Click on run tests or press Ctrl + enter.
Now moving on to the next task ...
Uncomment HTML
Commenting is way for you to leave comments related to your code or anything you like without actually affecting the code itself.
Cool right!?
Now in different programming/markup languages there different ways to comment, but more on that later for now let's talk about HTML
In HTML you can start a comment by <!--
and end a comment by --> .
Now in this task your editor looks like this
<!--
<h1>Hello World</h1>
<h2>CatPhotoApp</h2>
<p>Hello Paragraph</p>
-->
All you have to do is remove the comment tags which will look like this
<h1>Hello World</h1>
<h2>CatPhotoApp</h2>
<p>Hello Paragraph</p>
Then click on run test(Ctrl+enter)
2 Tasks Completed!
That's it for now
Comment below to ask and questions related to this and I will be sure to answer it
Don't forget to like, tweet, share, subscribe!
Friday, 5 January 2018
CatPhotoApp (FreeCodeCamp Front-End Development Certification )1
Headline with the h2 Element
In the next few challenges you will be making a cat photo app using HTML5, CSS and Bootstrap
that will look like this

In the first task you have to give this app a <h2></h2> element tags
This element tells the browser about the structure of your website.
h1 elements are often used for main headings, while h2elements are generally used for subheadings. There are also h3, h4, h5 and h6 elements to indicate different and new sections.
Add an
h2 tag that says "CatPhotoApp" to create a second HTML element below your "Hello World" h1 element.
If you have read my previous post or done the previous task you might remember the <h1>Hello World</h1> tags here without touches the previous code in the editor you just have to write on the next line <h2>CatPhotoApp</h2> like this
Comment below to ask and questions related to this and I will be sure to answer it
Don't forget to like, tweet, share, subscribe!
Wednesday, 3 January 2018
FreeCodeCamp Front-End Development Certification
How To Create An Account On FreeCodeCamp
Follow this freecodecamp signup You can easily sign up with your email address and enter a password simple
How freecodecamp works
In freecodecamp you are given an online editor in which you will write the code and a console in which you can run run code and see the result.!
You can connect to fellow camper from a different city or country or find something in your city through their forum, you can pair program with them or with anyone you know.
HTML5 & CSS challenge no.1
HTML5 is a markup language used for structuring and presenting content on the World Wide Web. It is the fifth and current major version of the HTML standard.
Say Hello to HTML Elements
In this challenge they tell about how html elements look like, for example <h1></h1> is an element of html where <h1> are opening tags and </h1> are closing tag of the element given above
tags.
The Task is Your
h1 element should have the text "Hello World".
In the editor it is written <h1>Hello</h1>
Now we have to write World next to the word Hello in the element like this <h1>Hello World</h1> then click the run test button or press Ctrl + enter
Comment below to ask and questions related to this and I will be sure to answer it
Don't forget to like, tweet, share, subscribe!
Monday, 1 January 2018
What to do in 2018?

Thus
begins a new year with the same question again what will I do this
year?
People
have a lot of answers of this question, but what they don’t realize
is that they will be doing the same thing they did last year or the
year before that or even the year before that.
The
same old cycle of thinking of doing something awesome becoming more
intelligent, becoming more beautiful, becoming more successful…but
wait!
Isn’t
that what you wanted in the previous years ?
You
still wish for those so does that mean you didn’t get those thing
before, so about changing the pattern of how you live your life I
mean take a Good Hard Look At Yourself
!
The
best investment you can do for a lifetime is to learn something with
a long term effect and don’t say you don’t have the time to
because if you can have the time to check your Facebook, twitter or Instagram or whatever you use you sure can take some time to learn.
But
hey! What to learn?
Well the answer to that question in my opinion is simple learn a
programming language because as the time is running into the future
those who know programming languages will always profit and just to
be clear I don’t mean go get a degree in computer science or
something , there are a lot of free sources from which you can learn
to program.
Below is one of those free websites which teach you as well as train
you as the programmer end result you get a skill set that will profit
you for the long run and for now as well and you land an awesome
job!

Thus begins a new year with the same question again what will I do this year?
FreeCodeCamp

FreeCodeCamp is an non-profit website for learning how to code they teach you about front-end development , back-end development and more in which you get to learn how to use html5, CSS3, Jquery, JavaScript, bootstrap etc .
You will be given coding challenges to complete and you will get your very own full stack developer certificate
Most
of the time it takes people around six months to a year to complete
just the front-end
developer course
which is of estimated 400 hours according to FreeCodeCamp.
It doesn’t matter if they are a degree holder in computer science or know nothing at all that’s just the average time people take for completing it.
developer course
which is of estimated 400 hours according to FreeCodeCamp.
It doesn’t matter if they are a degree holder in computer science or know nothing at all that’s just the average time people take for completing it.
But me and my twin brother completed the Front-End
Developer course in just 41 days!
Yes
it’s not a typing mistake it is 41 days, during which we were also preparing for our exams and working part-time jobs and no our exams were not relating to programming nor was the jobs yet we Aced in everything.
Developer course in just 41 days!
Yes
it’s not a typing mistake it is 41 days, during which we were also preparing for our exams and working part-time jobs and no our exams were not relating to programming nor was the jobs yet we Aced in everything.
If we
can complete this just 41 days while doing other things then so can You!
In the next few weeks I will teach you what challenges you will be
facing in FreeCodeCamp, what those challenges means and just how to
solve them
Don't forget to like, tweet, share, subscribe!
Don't forget to like, tweet, share, subscribe!
Subscribe to:
Posts
(
Atom
)

